


A Virtual Private Network is one of the basic yet strongest concepts you come across, the moment you step into the realm of Cloud Computing. It took me quite some time to grasp the concepts around the topic to get a wider understanding of it and now I would like to share you with the findings that I tumbled throughout the research.
Why do we need a VPC?
The name says it all. Breaking down the term VPC will take you somewhat closer to understanding what a Virtual Private Cloud is. 'Virtual' means it's not available physically, 'Private' means it's not open to the public and therefore implicit a taste of something personal. Therefore a Virtual Private Cloud is some space you create virtually in the cloud for your own purposes. It's that simple.
Technically speaking, A virtual network specifically allocated to your Amazon Web Services (AWS) account is called a Virtual Private Cloud (VPC). It gives you the ability to start AWS services in a logically isolated environment of your choosing, including EC2 instances, RDS databases, Lambda functions, etc.
Defining a VPC comes with a list of advantages.
Isolation and Security for your resources
Full Control over the Network
Variety of Connectivity Options
Scalability and Flexibility
A good mention would be the pros and cons of a VPC compared to a traditional private network dedicated to your operations. Obviously, it would be,
Cost-effective: You do not need to buy hardware.
Easily Scalable: No hassle in scaling the network if needed. It's just a few clicks away.
Secure: VPCs offer additional security measures and can be implemented smoothly across the network
So now with these things in mind, you may find it interesting to know more about the Amazon VPC service.
Networking Fundamentals: Prerequisite
Before getting into the depths of a VPC, let us brush up on some knowledge from the Networking Fundamentals class to be able to grasp the concepts yet to come super clearly.
You know that in a network the addressing of a device is done by IP Addresses. Each device in a network has a unique IP. It's similar to a postal address that we have to our houses to uniquely identify them.
A typical IPV4 address looks like this.

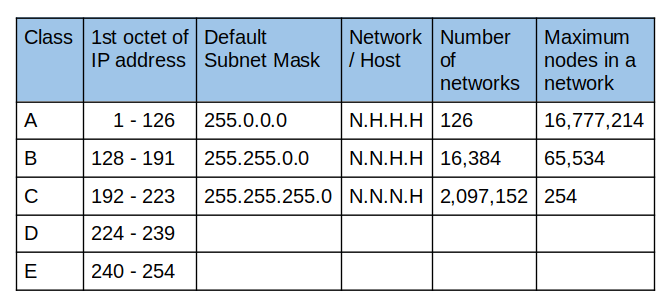
The IPV4 IP address contains four octets each with 8 bits. These separated by dots define the network ID and the host IDs of the particular Network we define. Based on the allocated bits for defining the Network IDs the above IP addresses are divided into several classes.
Here, classes A, B, and C offer addresses for networks of three distinct network sizes. Class D is only used for multicast, and class E is reserved exclusively for experimental purposes.
Class A: The First Octet(First 8 bits) defines the Network ID and the remaining 24 bits are allocated to host IDs. Since there are 8 bits to the Network ID we can have 127 unique networks in this way. But technically it's only 126 networks since two are allocated for special purposes by default.
Those two special addresses are Loopback Address (127.0.0.1) and All-Ones Broadcast (255.255.255.255)
Each network has 24 bits for defining the host, which means a total of 16.8 million unique hosts will be there in each network.
Class B: Here the first 16 bits are allocated for defining the Network IDs and therefore we are left with 16 bits to define Host IDs for each Network. An example of a Class B IP address is 168.212.226.204, where 168 212 identifies the network and 226.204 helps you identify the Hut network host.
Class C: Type of IP address that is used for the small network. In this class, three octets are used to indent the network. The remaining octet is to allocate Host IDs. This IP ranges between 192 to 223.
Now you got the idea. IP addresses do have a subnet mask which defines where this Network ID and Host ID breakdown is happening in the four octets. Is the subnet mask is 255.255.255.0 this means the Network ID is 24 bits or three octets. If it is 255.255.0.0 the Network ID section is 16 bits. The subnet mask is also noted in a slash notation along with the IP address as below.
192.168.1.1/24 meaning that the subnet mask is 255.255.255.0 or in other words 24 bits allocated to the Network ID.
CIDR: Classless Inter-Domain Routing
Classless inter-domain routing was introduced in 1993. This was a step forward from the traditional Classful addressing methodology which had inefficiencies and limitations. Network administration is made more versatile and scalable by CIDR, which allows an organization to build subnets of various sizes to handle varied numbers of hosts or network segments.
Classful IP addressing had pre-defined subnet masks as you can see in the above table. For example, imagine we need 30 host IDs/devices in our network. The traditional method of classful addressing will leave us with a Class C network that provides 254 addresses even if you need 30 for your usage. This clearly is a waste of the address space. With CIDR you can have a Variable Length Subnet Mask which matches your usage. You can create a /27 subnet which will allocate only 5 bits to the Host IDs, meaning 2^5=32 unique hosts are possible for this type of configuration.
Amazon VPC Overview & Design
There are several considerations that you need to keep in mind when creating a VPC in AWS. I will list them down swiftly as follows.
1. Allowed subnet size:
IPv4: You can create subnets with CIDR blocks ranging from /16 (65,534 usable addresses) to /28 (14 usable addresses).
IPv6: You have more options, with CIDR blocks from /44 (2^46 usable addresses) to /60 (2^36 usable addresses) in increments of /4.
2. Number of subnets:
You can create up to 200 subnets per VPC in each Availability Zone (AZ).
Each AZ can have a maximum of 5 VPCs.
Other Important notes:
The first four IP addresses and the last IP address in each subnet CIDR block are reserved and cannot be assigned to resources.
You can have a mix of IPv4 and IPv6 subnets within the same VPC, but each subnet needs to be either IPv4-only or IPv6-only.
Consider your security and resource needs when defining subnet sizes and avoid creating unnecessary subnets for optimal efficiency.
Be cautious of the above facts when creating a VPC.
Now let us get into practically creating a VPC on AWS. The Architecture of the VPC that we are going to build is given below.

Let us create the VPC named 'MyFirstVPC' in the AWS VPC Console under the region US-East-1. We will be choosing 192.168.0.0/16 as the CIDR Block. This means 16 bits are allocated to create Network IDs and we need to keep this CIDR in memory to proceed in creating Subnets in the future.
After creating our VPC which is pretty simple, we can move on to create the necessary subnets. Here we create a separate subnet for each Apps and Databases. You can think of any other subnets that suit your network layout. Also, we will create them in two availability zones under the same region.
What is an Availability Zone?
Availability Zone
An Availability Zone (AZ) is a physically separate data center within an AWS Region. Each AZ has its own power, network, and cooling infrastructure, designed to be independent of other AZs. This means an event like a power outage or hardware failure in one AZ won't necessarily impact other AZs. This redundancy enhances the availability and reliability of your applications and data.
Why do we need our subnets to be employed in different availability zones?
Increased uptime and fault tolerance: Distribute our resources across multiple AZs to minimize downtime due to localized failures.
Disaster recovery: If one AZ fails completely, our resources in other AZs can continue to operate, ensuring business continuity.
Reduced latency: Placing resources closer to end users in specific AZs can improve application performance and user experience.
Back to our journey of creating the VPC. Now that we know about availability zones, we can create the subnets mentioned in the diagram simply by selecting 'Subnets' in the VPC Menu.
We need to create App Subnet 1 in the Availability Zone Us-East-1a and also DB Subnet 1 in the same region. Carefully assign the IPv4 VPC CIDR block as 192.168.1.0/24 and 192.168.3.0/24 respectively for the two subnets. You can continue the process for the other subnets as well.
Now we can move to create a routing table under 'Route Tables' in the VPC console left menu. You have the freedom to create different routing tables for different subnets. Suppose we created two routing tables for App Subnets and Database Subnets as follows.

With the above routing tables created, the DBs won't be able to access the Internet since it is not mentioned in the route table, but the apps are allowed to access the Internet via an Internet Gateway which we also need to create separately and connect here. Creating an Internet Gateway is simply by giving out a name for the Internet Gateway under the 'Internet Gateways' sub-menu of the VPC Console Page.
I think it's a good place to have a pause since the article exceeds a healthy read length. However, this guides you to the domain of Cloud Computing as a Beginner to brush up on the fundamentals and have a bird's eye view of a VPC. Of course few concepts are yet to be discussed such as NAT gateways, private and public subnets so on and so forth for this section to be completed. Hope to address them soon. Stay Curious!